Connecting your Shopify store to CJdropshipping can greatly simplify your dropshipping business. CJdropshipping is a popular platform that offers a wide range of products, reliable shipping services, and seamless integration with Shopify. By linking CJ to your Shopify store, you streamline product sourcing, inventory management, and order fulfillment – allowing you to focus on marketing and growing your store. This beginner-friendly guide will walk you through the entire process step by step, from prerequisites to troubleshooting, with clear instructions and screenshots.
Introduction to CJdropshipping and Its Benefits
CJdropshipping is a dropshipping service that connects Shopify sellers with a vast catalog of products and automates order fulfillment. Unlike traditional retail, you don’t need to hold any inventory – when a product is sold on your Shopify store, CJ procures it and ships it directly to your customer. This model keeps startup costs low and reduces risk, since you purchase products only after you’ve made a sale.
Why use CJ with Shopify? The integration between CJdropshipping and Shopify is very smooth, which means you can import products with a few clicks and keep inventory levels in sync automatically. CJ offers thousands of products across many categories, so you can easily find items that fit your niche. It also provides automated order processing and real-time inventory updates – when an order comes in, the details sync to CJ for fulfillment without manual input. Overall, using CJdropshipping with Shopify lets you hand off the operational tasks (sourcing, packing, shipping) to CJ, while you concentrate on marketing, customer service, and scaling your business.
Prerequisites: What You Need Before Connecting
Before you begin, make sure you have the following in place:
-
A Shopify Store: You should have an active Shopify store (even a trial store works for setup). If you haven’t created one yet, sign up on the Shopify website and follow the on-screen steps to set up your store.
-
CJdropshipping Account: Go to the CJdropshipping website and register for a free account if you don’t already have one. You’ll need a CJ account to connect with Shopify. Sign up by providing your email, creating a password, and verifying your account – it only takes a minute.

-
Shopify Admin Access: Ensure you can log in to your Shopify admin dashboard. You’ll be installing the CJ app through the Shopify admin and authorizing the connection.
-
Stable Internet Connection: As with any app integration, having a stable internet connection will help avoid interruptions during the setup process.
Once you have both a Shopify store and a CJdropshipping account ready, you’re all set to connect them! In the next section, we’ll go through the step-by-step process of linking CJ to your Shopify store.
Connecting Your Shopify Store to CJdropshipping (Step-by-Step)
Follow these steps to install the CJ app and authorize the connection between Shopify and CJ:
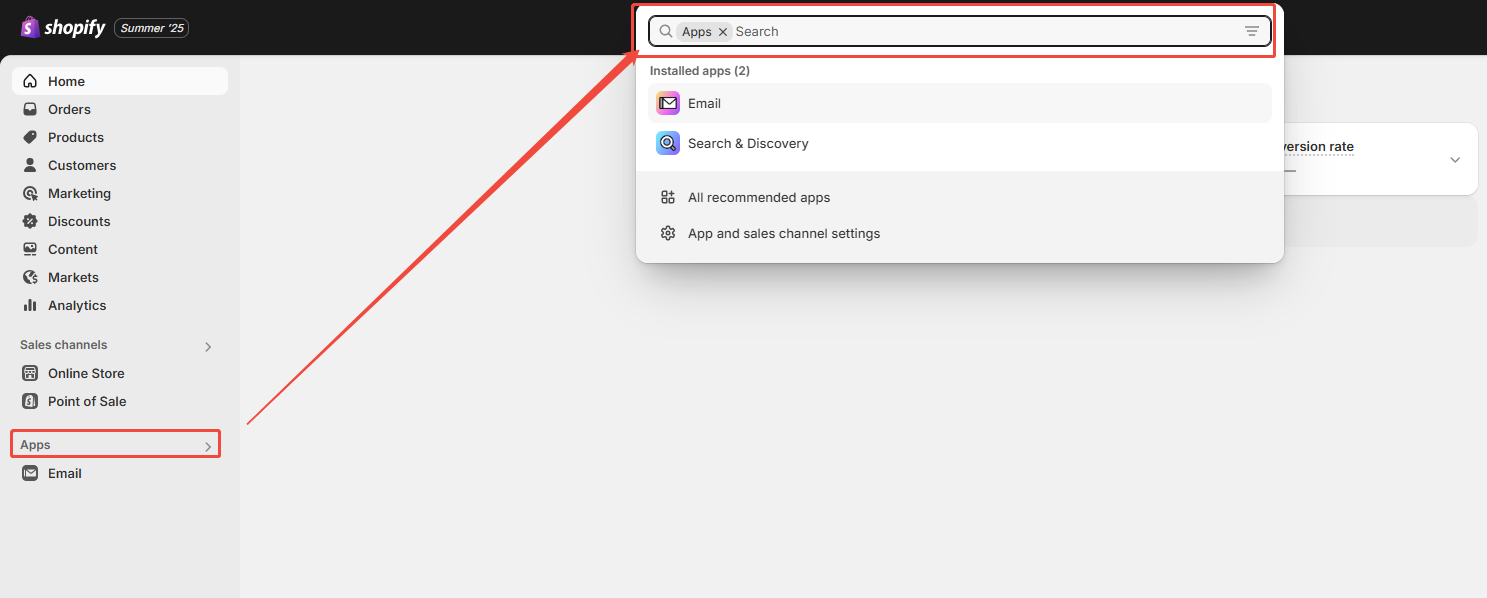
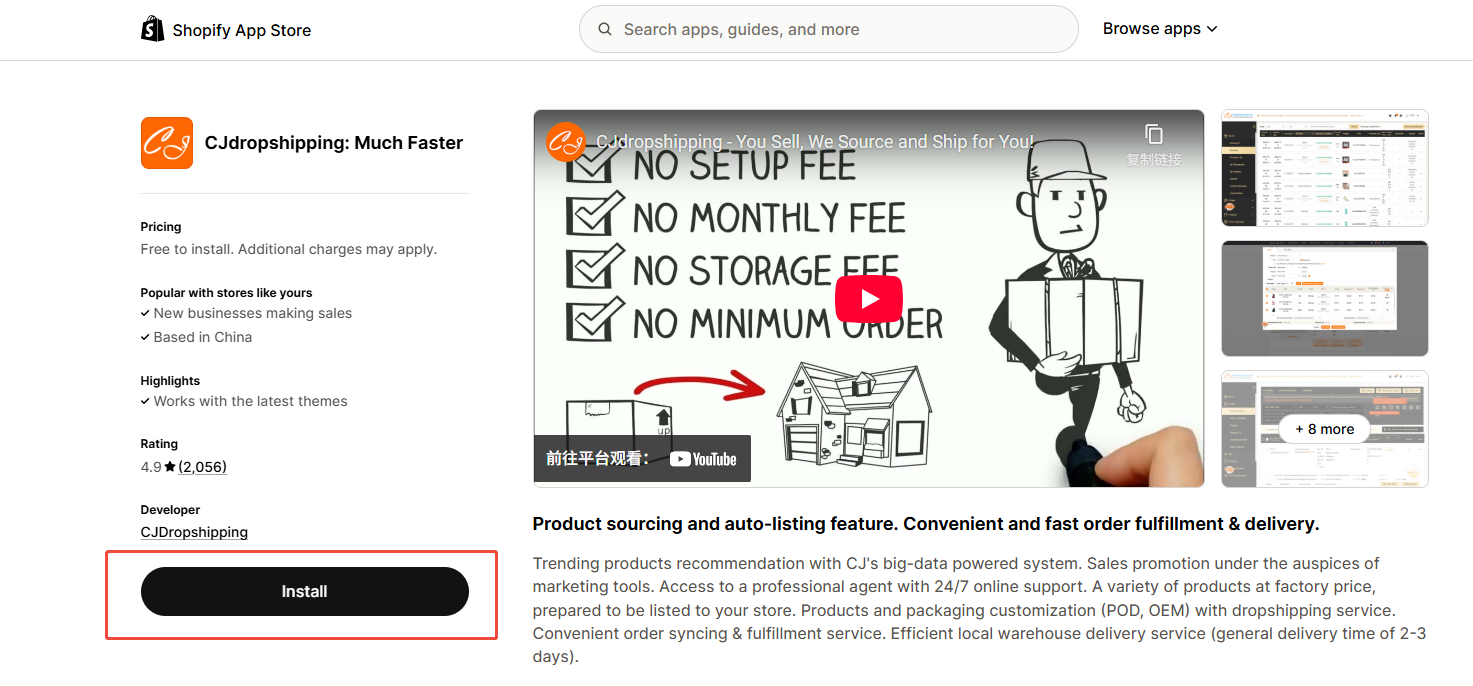
1.Install the CJdropshipping App from Shopify. Log in to your Shopify admin dashboard and click on “Apps” in the left sidebar. Then click “Shopify App Store”. In the App Store, search for “CJdropshipping”. Find the official CJdropshipping app and click “Add app” to install it on your store. Shopify will prompt you to confirm the installation – approve the required permissions to proceed.
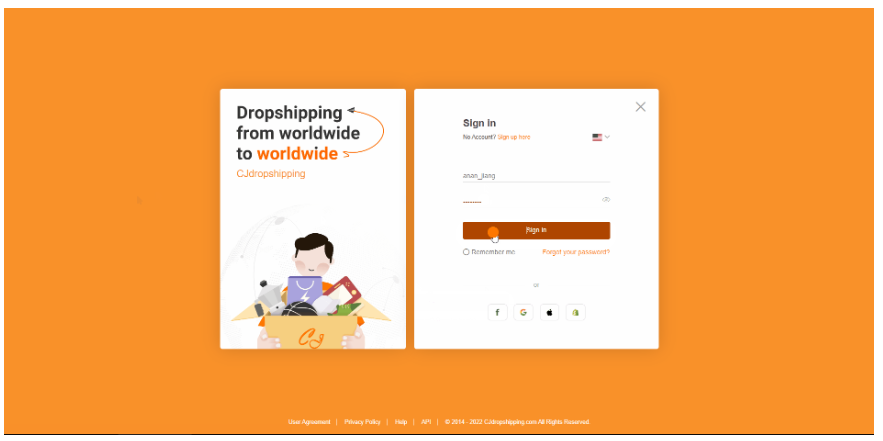
2.Authorize the App and Connect to CJ. After installation, go back to your Shopify admin and open the CJdropshipping app (find it under Apps). The app will prompt you to log in to your CJdropshipping account. Enter your CJ username and password, then click “Connect” or “Authorize” to link CJ with your Shopify store. This step grants CJ permission to read products and orders from your store so it can manage them for you.
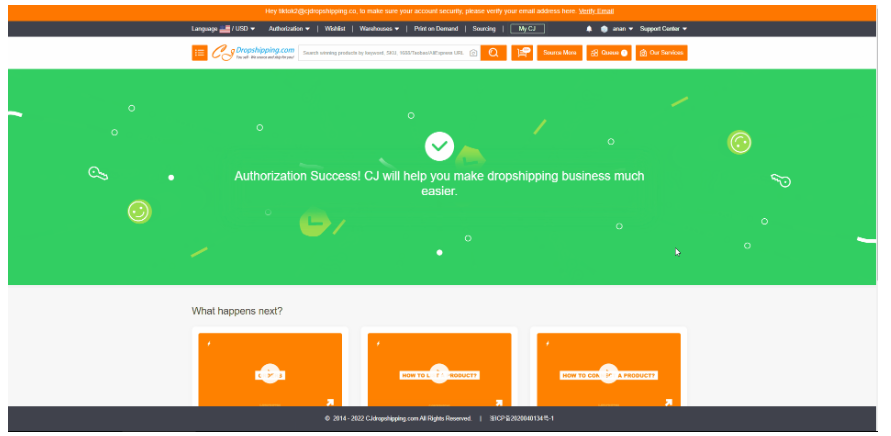
3.Complete the Integration. Once you authorize, the CJ app will finalize the connection. You should see a confirmation message or popup indicating that the authorization was successful. For example, CJ might display an “Authorization Success” message in the app interface.
After installing the CJ app and logging in, you’ll see a confirmation popup that your Shopify store is successfully authorized with CJdropshipping. Once you get this “Authorization Success” message, CJ can access your store’s products and orders for automated fulfillment.
Verify the Connection in CJ Dashboard (Optional). If you log in to your CJdropshipping account on their website, you can navigate to the “Store Authorization” or “Authorization > Shopify” section. You should see your Shopify store listed as connected/authorized. This confirms that the integration is active. (This step is optional, but it’s a good way to double-check that everything is set up correctly.)
That’s it! Your Shopify store is now connected to CJ Dropshipping. In just a few clicks, we installed the CJ app and linked the accounts – from here, you can start importing products and automating order fulfillment. In the next sections, we’ll cover how to add products from CJ to your store and handle orders.
Importing and Syncing Products from CJ to Shopify
Once your store is connected, you can easily import products from CJ’s catalog into your Shopify store. CJ offers two primary ways to add products: using the CJ Shopify app interface or using the CJ website. We’ll outline a simple method below:
1.Browse Products on CJ. In your Shopify admin, open the CJdropshipping app you installed. Go to the “Product List” or “Products” section within the CJ app. Here you can search for items by keyword or browse categories and trending products. You can also do this on the CJdropshipping website if you prefer – the product catalog is the same.
2.Select a Product to Import. When you find a product you want to sell, click on it to view details like images, price, and variants. In the CJ app, add it to your import queue by clicking “Add to Import List” (or a similar button). You can add multiple products to your Import List this way. Alternatively, on the CJ website, you might see a “List” button – clicking “List” will start the process to publish that product to your Shopify store directly.
3.Configure Listing Details. Go to the Import List in the CJ app to review the products you selected. For each product, you can edit the title, description, variants, images, etc., before pushing it to your store. Pay special attention to pricing and shipping: set a retail price that covers the product cost and shipping (we’ll discuss pricing strategy in a later section). Also, choose the shipping method and destination country for the product to see the estimated shipping cost and delivery time.
CJ’s listing interface allows you to customize product details before adding to Shopify. You can choose the warehouse (origin), see shipping options and costs, and set your retail price for each variant. In the example above, the CJ app shows the supplier’s price, estimated shipping fee, and delivery time. Make sure to select an appropriate shipping method and adjust the “Your Price” field to include your margin. Once everything looks good, click “List It Now” (or “Import to Store”) to publish the product to your Shopify store.
4.Import the Product to Shopify. After editing, click “Import to Store” (in the app) to actually create the product in your Shopify store. CJ will transfer the product title, description, images, variants, and pricing you’ve set into your Shopify Products section. Within a few seconds, you should see a confirmation like “Listed Successfully” on CJ.
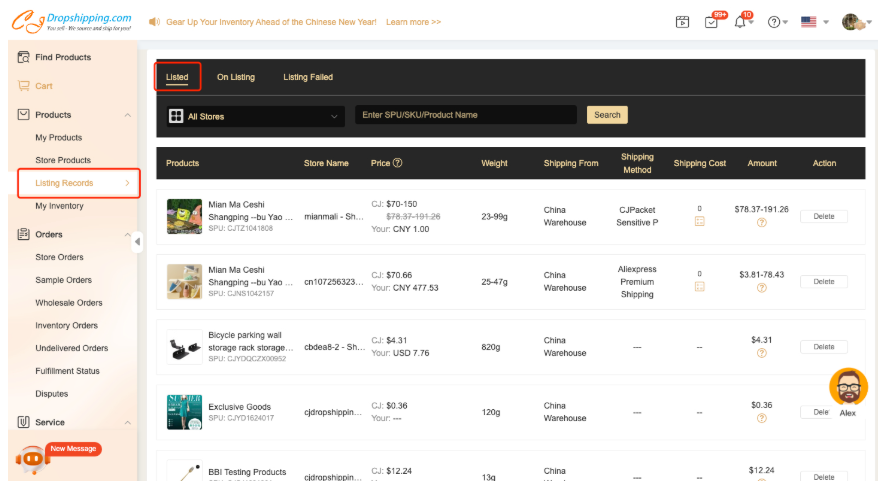
5.Verify the Product in Shopify. Go to your Shopify admin Products page and confirm that the new item appears in your catalog. You may edit it further in Shopify if needed (assign it to collections, tweak SEO, etc.). On CJ’s side, the product will now be linked to your store. CJ’s app may list it under Store Products or Listing Records, where you can see all products you have imported.
From now on, inventory sync is automatic. If the product stock changes on CJ’s side or if you sell one, the inventory count can update on Shopify (so you don’t oversell). This integration ensures your Shopify store always has up-to-date stock levels for CJ products.
Tip: It’s good practice to write unique product descriptions and titles when adding products. The CJ import will copy the supplier’s info, but customizing it for clarity and SEO will make your store look more professional. You can edit descriptions either before importing (in the CJ app) or afterwards in Shopify. High-quality product images are usually provided by CJ; consider using multiple images to showcase the item.
Managing and Fulfilling Orders through CJdropshipping
With products imported and live on your Shopify store, you can start selling. When orders come in, the CJ integration will help you fulfill them smoothly. Here’s how order management works with Shopify + CJ:
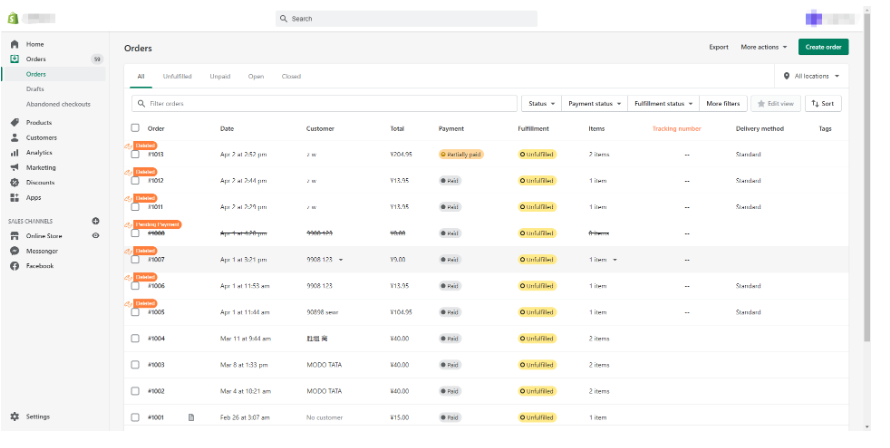
1.Order Sync to CJ: Whenever a customer places an order on your Shopify store for a product sourced from CJ, that order is automatically synced to your CJdropshipping account. The CJ app will pull the order details (product, quantity, customer address, etc.) into its system so that it’s ready to be processed. You can view these synced orders by opening the CJ app and clicking on the “Orders” section (or by checking the Imported Orders on CJ’s website interface).
CJ Dropshipping provides an order dashboard that shows all your Shopify orders that need fulfillment. In the Imported Orders screen above, you can see an order pulled in from Shopify with details like the product name, order number, and customer info. From this dashboard, you can select orders to process, pay for them, and track their fulfillment. CJ even allows order management actions like splitting or combining orders (useful if customers buy multiple items). This central view makes it easy to handle all dropshipping orders in one place.
2.Paying for the Order: CJ will not charge you automatically; you need to pay CJ for each order so they can fulfill it. Think of CJ as your supplier – you pay the wholesale cost + shipping for the product, and then CJ ships it to your customer (the customer has already paid you the retail price on Shopify). In the CJ Orders dashboard, select the pending order and proceed to payment. CJ supports various payment methods (PayPal, card, etc.) to pay for the order. You can also top up a balance on CJ for faster processing, or set up automatic payment if desired.
3.CJ Fulfills the Order: After payment, CJ’s team will pick, pack, and ship the product to your customer on your behalf. They handle the logistics from their warehouse. You don’t need to do anything manually in Shopify to mark it fulfilled at this stage – the integration will take care of it once shipment is underway.
4.Tracking and Updates: Once CJ ships the order, they will provide a tracking number. The CJ app automatically syncs the tracking number and order status back to your Shopify store as long as the integration is properly set up. This means the Shopify order will be marked as fulfilled and the customer can receive the tracking information you received from CJ. You can also find tracking info in the CJ order dashboard and relay it to the customer if needed.
5.Customer Notification: Shopify, by default, can send a shipment confirmation email to your customer including the tracking number. It’s a good idea to double-check that the tracking is correctly attached. Providing tracking quickly keeps customers informed and happy. If you notice the tracking hasn’t synced automatically, you can copy it from CJ and update the Shopify order manually (though normally this shouldn’t be necessary).
6.Post-Fulfillment Support: CJ’s job is essentially done after they ship the item. However, if there are any issues (e.g., delays, lost package, product problems), CJ offers support to resolve them. You can contact CJ’s 24/7 support chat for help. Meanwhile, ensure you continue to communicate with your customer – great customer service (like informing them of shipping progress or delays) goes a long way.
Key point: After connecting CJ, most of the fulfillment process is automated. New orders go straight to CJ, and once you pay for them, CJ handles fulfillment and updates Shopify. Always keep an eye on your CJ app’s orders section to ensure orders are being processed in a timely manner. If an order isn’t showing up in CJ, it might be because the product isn’t linked correctly (see Troubleshooting section for how to fix this).
Tips for Handling Tracking, Branding, and Pricing
Running a dropshipping store involves more than just connecting apps. Here are some essential tips regarding order tracking, branding your business, and setting the right prices:
-
Order Tracking: Make sure that tracking numbers from CJ are syncing to your Shopify store correctly. By default, the CJ app will push tracking info once an order is fulfilled. For this to work, ensure the inventory/fulfillment service for the product is set to CJdropshipping or Shopify (and not some other third-party). Shopify’s policy is that if a product’s inventory is managed by an unrecognized service, it may block automatic fulfillment updates. The simple solution is to edit your Shopify product and set “Inventory managed by” to CJdropshipping (or to Shopify) so that CJ’s tracking updates flow through. This way, your customers will automatically get tracking information, and you’ll see fulfillment status in Shopify without manual input. Always double-check a few initial orders to confirm everything is syncing as expected.
-
Branding and Packaging: One concern with dropshipping is branding – you want your store to have a professional feel, even if a third party is shipping the product. CJ Dropshipping does allow some custom branding options. For example, they support print-on-demand (POD) products and custom packaging (OEM) services. This means you can potentially have your logo on products or use custom package inserts if you work with CJ’s team (often this requires ordering some stock or paying extra fees). As a beginner, the simplest way to brand is through your online presence: make sure your Shopify store’s branding is strong (logo, theme, domain name, etc.), because the packages sent out by CJ might be unbranded or generic. If having branded packaging is important to you, discuss options with your CJ agent – they can often accommodate things like branded thank-you cards or custom parcels once you have a steady order volume. Remember, providing a consistent brand experience will help your store stand out, even when using dropshipping.

-
Pricing Your Products: Setting the right price is crucial. You need to cover all costs and still make a profit, but also stay competitive. With CJ, your cost per product = product base price + shipping cost (CJ will show you both). Shopify will also charge transaction fees or payment fees on each sale, and you have your Shopify plan monthly fee. A common approach is to use a formula to price your items: for example, Retail Price = Product Cost + Shipping + Shopify Fees + Profit Margin. CJ might show a recommended price, but always do your own calculation. Let’s say a widget costs $5 on CJ and shipping is $2, that’s $7 total cost. If you want a $10 profit, set your price around $17 (ignoring small Shopify fees for now). Check market prices for similar products to ensure your price makes sense. You can always adjust pricing in Shopify after importing a product. Tip: Be transparent about shipping costs – either build it into your product price and offer “Free Shipping” or charge shipping at checkout. Just avoid scenarios where shipping cost surprises the customer, as this can hurt conversion rates.
-
Efficient Order Handling: As your store grows, keep an eye on the operational side. For example, CJ allows you to bulk pay for orders or even automate order fulfillment (you can enable an automatic order feature where CJ will process orders using your pre-authorized payment method). While this might be advanced for a beginner, it’s good to know such features exist for scaling up. Also, consider using CJ’s mobile app or Chrome extension for on-the-go monitoring and quick product sourcing. The Chrome extension even lets you import products from marketplaces like 1688 or AliExpress to CJ for sourcing.
-
Customer Communication: This isn’t directly about the CJ-Shopify connection, but it’s related to tracking and shipping. Always communicate expected delivery times clearly to your customers (for instance, if CJ is shipping from China to the US, typical times might be 2-3 weeks unless you used a local warehouse). Set proper expectations on your product pages or shipping policy. Then, use the tracking info to keep customers updated. Delays can happen in dropshipping; proactive communication can turn a potential complaint into a positive review if handled well.
By keeping these tips in mind, you’ll maintain a smooth operation: customers will know where their orders are, your brand will grow stronger, and your pricing will ensure you stay profitable.
Common Issues and Troubleshooting
Even with the best setups, you might encounter some hiccups. Here are common issues beginners face when connecting Shopify to CJ Dropshipping, and how to resolve them:
-
CJ App Installation or Authorization Issues: If you installed the CJ app but didn’t see the success confirmation, it could be that the authorization process was not completed. Open your Shopify Apps and click the CJdropshipping app again; it should prompt you to log in to CJ. Make sure you complete the login and authorization inside the app. Another possibility is that your Shopify store was previously connected to a different CJ account (or vice versa). In that case, CJ might not authorize a second account. According to CJ, if your store is already linked to another CJ account, you’ll need to log into the original CJ account or use CJ’s Store Transfer feature to move the store authorization. To troubleshoot, try removing the CJ app and re-installing it fresh, then carefully follow the connection steps. If you see an error that the store is connected elsewhere, contact CJ support – they can help disconnect the old link so you can authorize anew.
-
Products Not Importing or Missing in Store: If you clicked “List” or imported a product but don’t see it in Shopify, first give it a minute and refresh your Shopify Products page. Sometimes there’s a short delay. If it still doesn’t appear, check CJ’s Listing Records (in the CJ app or website) to see if the product shows a status or error. Common reasons for listing failure include exceeding Shopify’s variant limit (Shopify allows max 100 variants per product) or hitting a daily listing quota. CJ might show an error like “Daily variant creation limit reached” if you tried to list too many variants at once. The solution in such cases is to try again after 24 hours, or reduce the number of variants. Another scenario: if you manually created products in Shopify (not through CJ) and now want CJ to fulfill them, you must connect those existing Shopify products to CJ’s products using the “Connect” feature on CJ. This isn’t an import, but rather linking a Shopify SKU to a CJ SKU. In the CJ app, go to Products > Store Products, find the item, and use Add Automatic Connection to match it with a CJ product. After connecting, future orders for that product will route to CJ. Always ensure that every product you plan for CJ to fulfill is either listed via CJ or connected to CJ’s catalog.
-
Inventory or Stock Showing as “Sold Out”: Sometimes after connecting with CJ, merchants see their products marked as out-of-stock on Shopify even though CJ has stock. A typical cause is misconfigured inventory locations in Shopify. When you install CJ, it may add a new inventory location (for CJ’s inventory tracking). If your product isn’t assigned correctly or Shopify gets confused by multiple locations, it might show 0 available. One Shopify expert noted that multiple inventory locations can cause the available quantity to appear wrong. To fix this, check your product’s Inventory settings in Shopify: you may see more than one location (e.g., “CJdropshipping” and “Online Store” or others). If stock is at CJ’s location, ensure that location is active and counted toward availability. You can adjust inventory or deselect unused locations so that the correct stock shows. In short, make sure the product is set to track inventory via the CJ location with an available quantity. If needed, disable “Track quantity” and allow unlimited stock for the item, or periodically sync inventory from CJ (the CJ app can sync inventory levels for you). This will prevent false “Sold Out” issues.
-
Tracking Number Not Updating on Shopify: If an order was shipped by CJ but the tracking number didn’t appear in the Shopify order, the first thing to check is the inventory manager setting as mentioned in the Tips section. Shopify only auto-updates tracking if the fulfillment service is the same app. Ensure that the product is set to be fulfilled by CJdropshipping. If you initially set the product to be managed by another app or “Custom”, Shopify might not accept CJ’s tracking update. To resolve this, edit the product in Shopify admin: under Inventory, set “Inventory managed by” to CJdropshipping (or to Shopify and let CJ app handle fulfillment). After correcting this for future orders, you might need to manually add tracking to any past order that missed it. Going forward, CJ will sync tracking automatically once this is configured properly.
-
Orders Not Syncing to CJ: If a customer placed an order but it’s not showing up in CJ’s Order list, it usually means CJ doesn’t recognize the product or the order. This can happen if the product wasn’t listed or connected via CJ (as discussed earlier). The remedy is to connect the product in CJ, and then manually sync orders. In the CJ app, there may be a “Sync Orders” button or you can ask CJ support to pull in any missing orders after you connect the products. Another less common reason is if the order is from before the store was connected to CJ – past orders won’t automatically import. Only new orders after integration will sync (unless you use a CJ feature to import historical orders). For new stores, this shouldn’t be an issue.
By following this tutorial and keeping these troubleshooting tips in mind, you should be well on your way to running a successful dropshipping store with Shopify and CJ Dropshipping. Remember, every new tool has a learning curve, but with a bit of practice, you’ll master the workflow. Happy dropshipping!